
SUPPLIES NEEDED:
11X14 Canvas (stretched, canvas board or canvas sheet from Acrylic painting pad
Chalk or chalk pencil (gray or blue)
Hair Dryer, small mister bottle for water,Ruler,
Jar or other container for water (for brush cleaning) and a styrofoam (I like the oblong divided ones) for a paint palette
Brushes: Taklon bristles:¾” Filbert, ¾” & ½” flat, liner (or script)
White stiff bristle : ½” “scrubby”, medium sized Fan brush, 2” Chip brush from the hardware store

Colors: Ultramarine Blue, Pthalo Blue, Titanium White, Black, Yellow Ochre, Sap Green, Burnt Umber, Burnt Sienna, yellow medium, Dioxazine (or other very dark) Purple.
Under Layer: Make a mix of Yellow Ochre + a little White + water to thin it to an ink consistency. Use the 2” chip brush to paint the entire canvas, wipe it off with paper towels & dry with hair dryer. This gives color to the canvas and acts as a first layer for the remaining paint to adhere to.

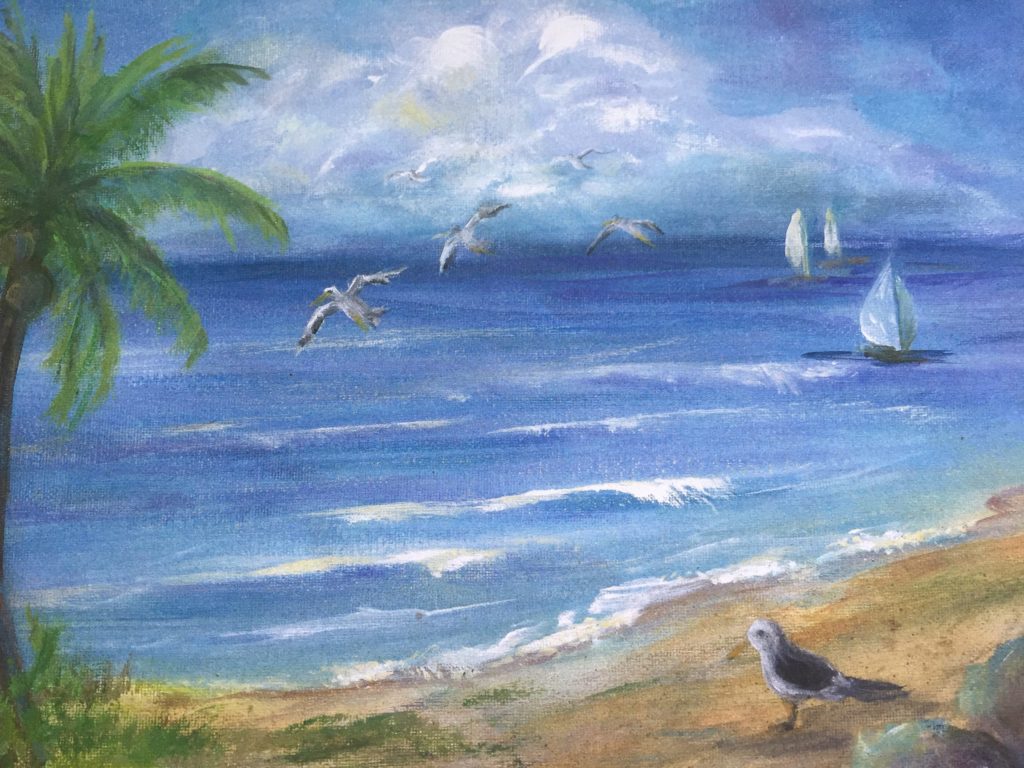
SKY: Use chalk and the ruler to draw the horizon line about 5” from top of the canvas
Mix sky color starting with White and adding a small amount of Ultramarine Blue (+ just a tiny touch of Burnt Sienna to dull the color BUT, too much will make it muddy) to make a light sky color.. When mixing light colors, ALWAYS START with the lightest color. Paint in the entire sky area, using your largest flat or filbert brush. Use enough paint to cover the yellow of the under layer. Go back to your basic sky mix and add a tiny bit more UMB + a tiny amount of Deep Purple) and use to slightly darken the upper corners and blend in.

CLOUDS: Using White + a bit of the lighter sky mix, paint in cloud formations (look better in larger and connected shapes). Keep edges soft and allow them to blend into the sky. Use your “scrubby” or filbert to to apply the paint in upward, ligjht circular motions. Come back with pure white + tiny touch of Yellow Ochre & highlight the clouds to give a “puffy” look. Can use your finger to soften the edges if necessary. (I like finger painting)
Accents: Using the deep purple, thinned down with water and very little on your brush, add to the upper sky and even to the clouds. This is just an accent, so use it very sparingly.
Beach: Mix White, + Yellow Ochre+ tiny touch of Deep Purple + touch of Burnt Sienna to make a warm sandy color. Paint the beach, starting at the bottom of the canvas & working upward towards the water. DO NOT MAKE A HARD LINE WHERE THE SAND MEETS THE WATER. Mist with a little water.
Go on to do the water so that we can melt the water onto the beach.
Water: Use chalk or your chalk pencil to sketch in the curving beach line. This should start about 5” up on the Right side and be about 2” up on the Left side. Make a nice soft curving line and keep it loose, not hard.
The water Mix is Pthalo Blue + a touch of UMB, a touch of deep purple anda bit of White. It should be darkest at the horizon line (right below the sky) and gradually get lighter as it comes to the sandy beach. Lightly mist the water area w/ to keep the paint moist and moveable. With the lightest water color to paint the edge where water & beach meet & pull some of the sandy mix over the waters edge, very lightly to give the illusion of transparency

Waves; Using some of Thalo blue + white & the UMB + White mixes, streak some across the water to create a variegated appearance (and helps to create the “foreshortened appearance of waves, off in the distance). Then as you come closer to the shoreline, the waves will appear closer and therefore larger and whiter. To achieve this, use your large flat brush to add more white streaks. Do the same with a bit of your darkest water mix, only placing these streaks UNDER the white ones for shadow & depth.
Froth: Use slightly “dirtied white” (white + touch of palette mixes. Use the corner of your fan brush to add froth to the tops of a FEW waves.
Holding your flat brush, loaded with very thin and a very LIGHT water mix (White + Thalo Blue), push waves onto the shoreline over the sand (Keep transparent). The using very thin Burnt Umber on the f lat brush, slide a light shadow under each wave. Use the corner of the fan brush to add froth to the waves above the BU

Rocks: Use your chalk to 2 or 3 overlapping rocks in the lower right corner. Use you flat brush with Burnt Umber+Deep Purple + tiny touch of Black, and angled strokes, paint in Right sides (shadow side) of each rock. Pick up Yellow Ochre + white + a little of the shadow color and paint the Left sides of the rocks. Accent with a little YO + White for highlight.
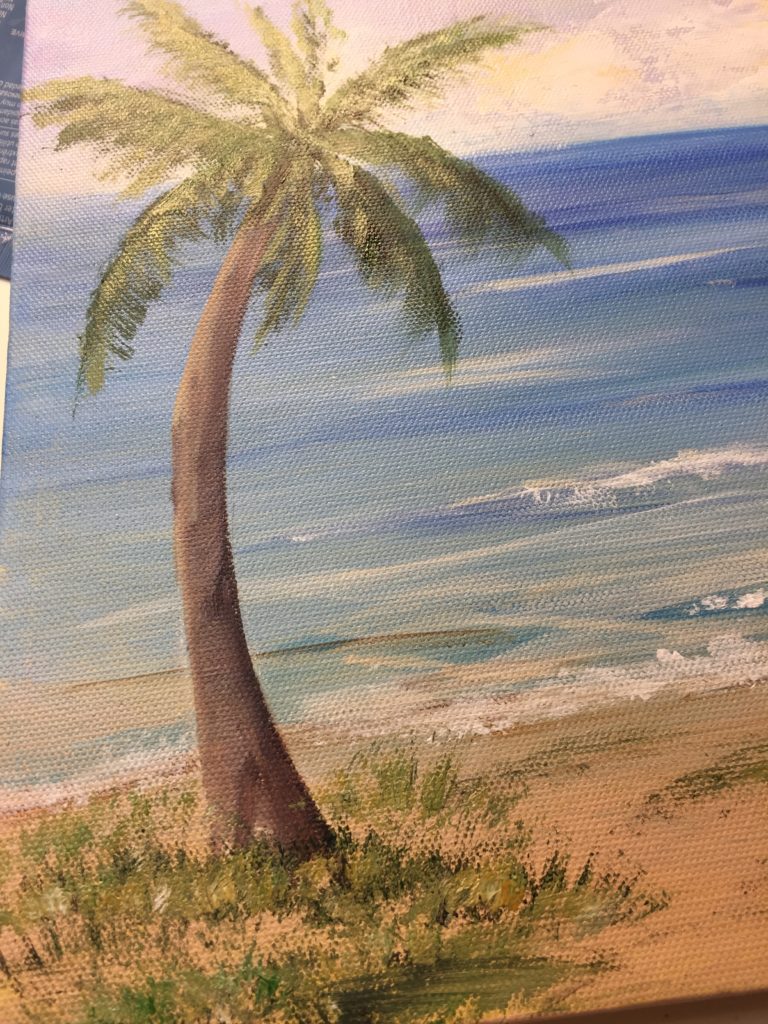
Palm Tree: Use chalk to sketch in palm tree trunk, about 2 “ from Left edge of canvas. Using Rock mixes, both dark and light, paint the trunk, keeping highlight on left side and shadow on R.
Palm Fronds: Using thinned Burnt Umber and the liner brush, sketch in the skeleton of the fronds (looks somewhat like an umbrella with no fabric).
Using a fan brush and dark sap green mix (sap green + touch Black), paint the shadow of the leaves. DO NOT USE FAN BRUSH IN FAN SHAPE. – use shorter strokes so you create individual leaves but not the whole fan shape.
Highlight leaves are painted with (sap green + white + yellow medium). Use brush as above.
GRASS & BEACH JUNK; Sap green mixes, & fan brush. Place loaded fan brush against canvas & “jab” up (lifting at the same time), using corner of fan (DO NOT make fan shapes)
Spatter: Use mix of BS + Deep Purple ( other dirty colors from your palette), thinned down and loaded onto a fan brush.. Pull you finger or a palette knife back toward yourself, allowing the paint to spatter. Wipe off any that gets onto the water or where it is not wanted.
Look over the painting and decide if you need any more color accents.
Add birds or sailboats as desired.
Happy Painting!!
Thank you Rita for this site. I have been doing a few paintings but really miss the art classes at Heron’s Glen. Like Ron, I have also been baking and cooking. Always looking for new recipes and new ideas to paint so thanks again for this site.
Thank you Rita .I do believe I need this..